2010-12-21

Wireless Printer fails after Power Failure

Howto: Wireless printer quit printing after power failure. Solution: Change the printer's Channel configuration.

My Brother HL2170W wireless printer quit talking on the network after a neighborhood-wide power failure. When the router reset, it picked a different channel and the printer did not see the change. This can happen to any wireless device and most seem to recover - but, at least in this instance, the Brother printer did not. It had to be fixed manually.


Symptoms:
  • Windows control panel shows "printer offline"
  • Print jobs stacked in the queue
  • Printer configuration looked good - IP Addresses were preserved
  • Printer did not respond to a ping over the wireless
  • Rebooting the wireless router did not help
  • Could not login to the printer's configuration page over wireless, but could over a wired connection
  • Printer would print on the wired network but not the wireless
See also these similar symptoms:
Brother Printer in Perpetual Sleep


Did you just install a new Router?

See this Keyliner article:
Brother Wireless Printer Fails after New Router.

Testing:

Although not required: Assuming you followed this Keyliner article: Setting up a Brother Printer on Wireless, you would have configured the new printer for both wired and wireless --using the same IP Address.

In my case, the printer would choose 192.168.200.250 over either connection. With this setup, testing is easy: Plug in a cat5 network cable and print a test document. This proves the printer is functional and you do not have a workstation problem.

Additional testing:  From a DOS prompt, type "Ping 192.168.200.250"  (no quotes and your address may vary.  If the printer responds in xx milliseconds while on the wireless network, this article may not be the solution.  Note that a PING over a wired network may succeed when the Wireless network fails.


Likely Issue:

After the power failure, when the wireless (linksys or other) router rebooted, it re-negotiated a new channel because all of the other wireless routers in the neighborhood were doing the same thing at the same time. My network changed from Channel 3 to Channel 9 but the printer configuration remained on Channel 3.

It is best to leave the wireless router on the new channel. It chose that channel because of interference with other routers. Because of this, you will be forced to re-configure the printer.

If you have recently upgraded or replaced your router, it will have likely been set to a new channel.  Follow the steps in this article to teach the printer the new location.

Likely Solution:

In summary, follow these steps. See full details here: Setting up a Brother Printer on Wireless. Different-brand printers will have similar steps.

1. Connect the printer to a wired network.  Confirm status lights on NIC card.

It is *highly* recommended to use a wired connection when changing Wireless settings.

2.  Obtain the printer's IP Address:

Press the printer's GO button 3 times to print diagnostic pages.
On the network configuration pages, look for the wired IP Address on the 10/100Base-TX node.
Example address:  192.168.100.200

3. Launch a browser.

For the URL, type the printer's IP Address.  For example:  192.168.100.200

A configuration screen opens; this may take several moments.
On the top menu, click "Network Configuration"
On the displayed menu/screen, click the "Wireless" tab

4. Click menu item "Configure Wireless" (about halfway down the screen).

Of interest, note the currently-selected Channel number.

5.  Click button "Browse" (browse for Network SSID)

Choose your network's SSID.
Note the new Channel number; likely different than before.
Click OK to save.


6. On the Brother configuration screen (illustrated below), backspace all four WEP Keys (assuming you are not using WEP -- you should not be)

WEP Key1 (set all four to blank)
WEP Key2
WEP Key3
WEP Key4


7. PassPhrase

Type the passphrase used in your router's setup (hopefully, you have that documented somewhere -- this is the key all wireless devices must use to attach to your network.  Laptops would use this same key.  If you do not have this key, you will have to reconfigure the network router.).

Leave the USER ID and Password fields blank

8. Save (submit) changes.

This will re-negotiate / re-set the channel
You may see this message:


Unplug the Cat-5 cable
Wait about 1 to 2 minutes.  The printer will cycle itself.  Do not power off.
Close the Browser windows; you are done.

TEST

To test, disconnect the wired connection and reboot the printer.
Test printing over the wireless.
If desired, from a DOS prompt, you can PING the address:  PING 192.168.100.200


Router Reboot Notes:

If you reboot your router, it will likely keep the same channel it had before because all of the other routers in the neighborhood will be stable. But if the entire neighborhood is rebooting after a power failure, the odds of keeping the same channel are slim.

Other Possible Issues:
Although not addressed in this article, another possibility is the printer was setup to pull a new IP Address from the DHCP auto-assigned pool. This is a poor way to configure a printer; it should be given a static IP address, far away from the variable DHCP pool. For this reason, I always configure my printers in the upper ranges, such as .240 or .250.

As I recall, if you install your printer using Brother's CD, the installation sets the printer to pull a DHCP address (non-static). This is a mistake. Following the Keyliner instructions, above, you have to go out of your way to configure the printer with a "Static" address and you would have to do extra steps to make the wired and wireless connections the same. This goes a long way towards solving many networked printer problems.

Related Links:
Reference for Brother Printer LED Indicators


Related articles:
Setting up a Brother Printer on Wireless
Brother Printer Toner Cartridges
Brother HL-2170W Laser Printer Review
Brother Wireless Printer Fails after New Router.
Brother Printer in Perpetual Sleep

2010-12-11

Brother Printer Wireless Fails after New Router

Brother Printer Wireless Fails after New Router with "Failed to Associate"

Issue: Brother laser printer HL2170W fails to print after installing a new Linksys (or other brand) router.  The wireless printer used to work on an older Linksys WRT110 router. 


Diagnostics:

A.  From the printer, press the GO button 3 times, printing a diagnostic page

On the printout, look for the Network Configuration Page "Brother NC-7400w IEEE 802.11b/g

Near the bottom, note the Wireless Link Status: "Failed to Associate"


B. You cannot reach the printer's web-config screens from wireless, but the config screens are reachable with a hard-wired Cat-5 cable.

C.  Print jobs may be spooled on the local workstations.

See this article for how to configure the printer to run on both Wired and Wireless networks

Keyliner Article - Configure Brother Printer for Network


Solution:

Summary:  Set the 2.4G side of the router to a WPA2/WPA Mixed mode and confirm the 5G side has a different broadcast SSID.  Then, rebrowse the wireless network from the printer's control panel.

1.  On your router (not the printer), confirm the 5G and 2.4G networks have different SSID names.

For example, on my Linksys router, there are duplicate configuration sections for 2.4G and 5G.
Set different SSID's names for both -- giving each similar names but with an appendage, something like this:

wolfhouse5g
wolfhouse24g

Here is my setup:
Click for larger view
2.  On the same configuration screen,

Set the 2.4G wireless network with Security Mode: "WPA2/WPA Mixed mode"

This way, older devices, such as wireless printers will still work properly.  Leave the 5G set as the default, WPA2 Personal, or as needed.


 3.  Login to the Printer's web-configuration screen. Note: It is *highly* recommended you use a wired Cat-5 connection when making changes to the Wireless settings.

Full Details in this article.
This is the same article you should use if the printer fails after a power failure.
http://keyliner.blogspot.com/2010/12/wireless-printer-fails-after-power.html

Summary:
a.  From a browser, type the printer's IP Address
b.  Login using "admin / (password you set when the printer was first configured)
c.  Open Network Configuration, Wireless Tab, Configure Wireless
d.  Browse for the SSID; choose the 2.4G SSID.  At the same time, it selects the channel.
e.  Cleanup the WEP keys; re-type the PassPhrase
f.  Save changes

4.  Immediately Unplug Cat-5 and wait for printer recycle:

After saving the new SSID, the printer displays this message. 
Unplug the printer's Cat-5 cable and wait approximately 2 minutes. 
The printer will cycle by itself:


5.  Test

From any workstation, send a print job to the printer.
All should be well.

Other Notes:
WPA/WPA-2 TKIP encryption changed with the new routers and if the SSID's for both networks were set to the same name, the Brother printer will pick the 5G network -- which it cannot actually use.

Updating the printer to the latest printer BIOS will not help. 

Other sites recommend using WEP encryption.  They are crazy.


Related Articles:
Brother Wireless Printer Fails after power failure
Configure Brother Printer for Network

2010-10-25

Windows 7 Streamline Start Menus

Howto: Windows 7, Windows Explorer Settings and how to streamline the Start Menu. Tutorial showing how to simplify and de-clutter the Start Menu. The second half of the article describes other Windows settings of interest. This tutorial covers many inter-related items and will take time to study.

See these related articles:
Windows 7 Explorer Settings
Windows 7 - Stop UAC Nags while editing Icons
Cleaning Startup Programs


Windows XP and Vista users should jump to this article: Streamline Windows XP / Vista Start Menu.
Contents:
  • Simplify the Side Menu
  • Recommended Explorer Changes
  • Cleaning up, tidy up Start Menus
  • Create a UTIL folder
  • Deleting Unneeded Folders
  • "Above the Line" Pin Permanent icons
  • Pin Documents to the Start Menu

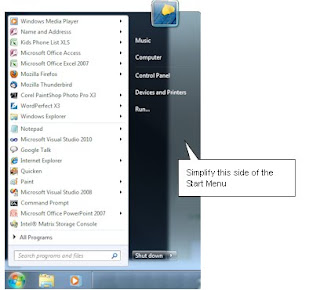
1. Simplify the Side-menu:


Simplify the Start-button's right-side sub-menu, by removing those items you do not need. For example, I save all data, music, photos, in C:\Data (rather than in my profile's "MyDocuments" folder -- this way other users on the same machine can access the files). Because of this, I do not need the My Documents, My Video, My Pictures, etc. You may need some folders, but not others.


a. Click Start, Control Panel, "Task Bar and Start Menu"

In the Start Menu tab, click "Customize"
In the vertical list, consider (unchecking/aka "Don't Display this item") the following items.

Pick and choose the ones you want to hide. For example, on my systems, all data is stored in C:\Data (not in MY Documents). Because of this, I hide almost all shortcut menus. See the bottom of this article for more discussions on C:\Data.

= Documents (if you use C:\Data) - Don't display this item
= Favorites - Don't display this item
= Music - Don't display this item
= Personal Folder - Don't display this item
= Pictures - Don't display this item
= Videos / Recorded TV - Don't display this item

In each case, pick and choose the ones you want to remove.
Click OK, OK when done.
Click on the Start Menu to see the results.

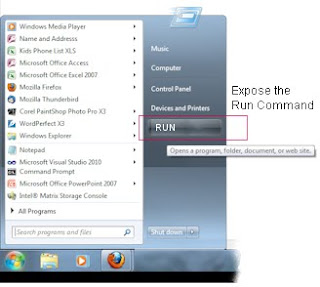
2. Recommended Windows Explorer Changes

Click Start, Control Panel, "Task Bar and Start Menu"
In the Start Menu tab, click "Customize" (same menu as above or Other-mouse-click Start Menu, Choose Properties, [Start Menu], Customize)

These changes are recommended and make the following steps easier:

where [ ] means uncheck and [X] means check:
  • [ ] "Help" (Uncheck; declutters the Start Menu)
  • [ ] "Default Programs" (Uncheck)
  • [X] "Run" (Expose the Run command
  • [ ] "Highlight Newly Installed Programs" (Uncheck)


3. Clean up and Organize the Start Menu:

Simplify your life and consolidate or delete unneeded programs and groups from the Start Menu. The illustration below shows a relatively cluttered Start Menu; yours is likely far worse. Notice it is long enough to require a scroll-bar.

"Before"

4. Begin the Cleanup
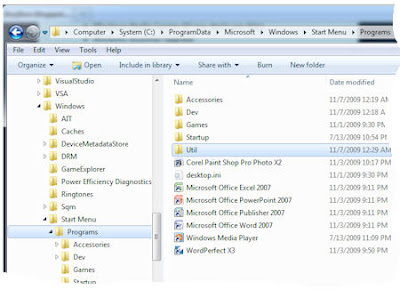
a. Open Windows Explorer. Tunnel to this path (these items are visible because of the Explorer changes made previously):

C:\ProgramData\Microsoft\Windows\Start Menu


(click illustrations for a larger view; click right-x to return)

b. Delete icon "Default Programs" (you will never use it)
c. Delete icon "Windows Update" (it is in the Control Panel)
d. Leave "desktop.ini"

5. Build Utility Folders

Create a new UTILITY folder by following these steps

a. Using Windows Explorer, tunnel to (same location as above)
C:\ProgramData\Microsoft\Windows\Start Menu\Programs
b. In the "Programs" folder (detail side), create a new "Util" (Utility) sub-folder by 'other-mouse-clicking" in the detail-side, choose "New Folder"
Name: "Util"

This is where you will put seldom-needed utilities and system tools. While in the area, notice the 'Programs\Accessories' Folder.


c. Using Windows Explorer, *Cut and Paste* the following common, but seldom-if-ever-clicked utilities to the UTIL folder. From the Windows Explorer detail-side, highlight these program icons and cut-and-paste them into the UTIL folder (if present):
  • Adobe (Acrobat) Reader
  • Windows Anytime Upgrade
  • Microsoft Security Essentials
  • Any other Virus software
  • Microsoft Silverlight

Similarly, highlight, Cut and Paste these icons, placing them into the Accessories folder:
  • Windows DVD Maker
  • Windows Fax and Scan
  • Windows Media Center
  • XPS Viewer
  • PowerPoint Viewer
  • QuickTime Viewer

My rule is this: If it is a geeky utility, one that your spouse our children would never want to see, put it in the UTIL folder. Other programs, such as Acrobat, PPT Viewers, etc, which are needed, but never directly clicked, put them in the ACCESSORIES folder. I consider Accessories "end-user" tools. The goal is to tuck them out of the way.

6. Move other (vendor) folders...:

With an eye towards other folders in the Programs group, ask yourself if they are really needed. While still in the "Programs" folder, locate the following subfolders and icons. If they seem useless or useful-but-never-clicked, consider moving them to Util or Accessories folders.

Examples to move into UTIL:
  • Administrative Tools
  • IIS 7.0 Extensions
  • Intel Storage Matrix Manager
  • Microsoft Mouse
  • Microsoft Security Essentials
  • Microsoft Silverlight
  • Maintenance
  • Nvidia Corporation
  • Tablet PC
  • Dell Support Center
  • Any Backup Programs you may have purchased
Examples to move into Accessories:
  • Dell Webcam Manager
  • Desktop Gadget Gallery
  • Creative Webcam
  • Adobe Acrobat Reader (icon or folders)
  • Roxio
  • Windows DVD Maker (icon)
  • Windows Fax and Scan (icon)
  • Windows Media / Media Center (if you don't use this)
  • Windows Anytime Upgrade
With each, cut-and-paste from the main "Programs" area into either UTIL or Accessories. You can, if desired, copy either the entire folder or just the icons within. Do not worry, the cutting and pasting (or even deleting) does not harm the installed programs.

Reasoning: You will never click the Acrobat viewer to open a PDF; instead, you will always double-click the PDF; the viewer opens automatically. Tuck these other seldom-used programs in a location that is out-of-the-way. Or, better yet, delete them; see below.


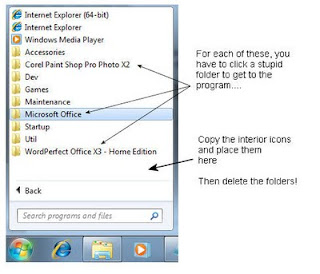
7. Get Rid of Unneeded Folders:

Folders, such as "Microsoft Office" or "Corel Paint Shop Pro Photo X2" do nothing but waste your time, making you click through a useless folder. The folders are often little more than an advertisement. What you really want is the program-application icon that lives inside.

Consider these example folders, such as "Corel Paint Shop Pro", "Microsoft Office", "WordPerfect Office". Once the single-executable icon within these folders is moved to a better location, the entire folder can be deleted -- removing another folder cluttering the Start Menu:


Deleting icons does not hurt the underlying features.

Steps:
a. Using Windows Explorer, tunnel to the "Programs" folder (same as before).
C:\ProgramData\Microsoft\Windows\Start Menu\Programs

b. Open Folder "Microsoft Office" (or any other application folder of interest)

c. Copy only the icons you use (e.g. "Paint Shop Pro" or "Microsoft Excel") and paste them one folder above, into the "Programs" folder. Don't bother copying Help Icons, Registration, or others that you have never clicked.

These icons will appear in the root of the ALL PROGRAMS menu. (See below for how to "pin" a copy on the Start Menu itself)


d. Test by clicking Start, All Programs. You will see these icons at the root of the folder.

e. Delete, yes delete, the original holding-folders. For example, delete the entire Microsoft Office Folder, WordPerfect Office, etc. -- Once you have saved the icons you care about, do not be afraid to delete those useless folder structures.

f. Consider moving some icons from the Accessories folder to the Programs folder, making them easier to find and more accessible:
  • Calculator
  • Paint
  • Snipping Tools
  • Sticky Notes

Another example of a corporate advertising folder: Acronis True Image Backup - the Shame

Here is the Acronis True Image Backup StartMenu folder-structure. Notice how they insulted you twice by tucking their most needed icon two-layers deep. Inside is only one icon that is of interest -- the main program icon. The rest of the icons are available from within the program (e.g. Help, Register, etc.).

Copy or cut the icon and paste it into the Programs folder (or Util). Delete the extraneous folders and all of the icons within:


You will find things like Help, Websites, Registration Links, Uninstall icons.
Be merciless and delete this crap.

Here is my machine after the cleanup with a much shorter "All Programs" list. Notice there is no vertical scroll bar. Click illustration for a larger view; click Back to return.
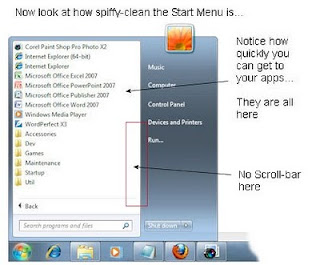

"After"

Deleting useless folders without fear. Delete things like Help, Uninstall, etc. Most of these functions are available from within the application or a control panel; there is no need to hog space in the menu system. Consolidate those icons you want to keep in Util or Accessories.

Here is Windows Explorer view of the same cleanup:


8. Permanent Icons: Pin

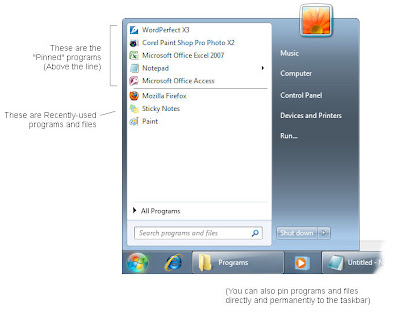
Continue by taking your most common, favorite applications and adding them to the first Start menu. With Windows 7, adding a program or icon permanently on the initial Start Menu is easy with a "Pin".

Icons can be added "above the line" in the Start Menu -- giving a quick link to your most commonly-used programs. This is faster than clicking the Start Menu, Programs. With this, all you need to do is click Start.

Benefits
  • Fixed, non-changing list
  • One click from the Start Menu
  • Place your most needed programs within easy reach
  • No need to click "All Programs"
By default, when you launch any application, Windows 7 tracks the most-recently-used programs and places them in the first Start Menu. This list can seem random and the entries can shift and change. You may prefer a more predictable list and you may want to get to this list quickly, without having to click "All Programs."

In older versions of Windows, these icons would have been placed manually in the Start Menu, and this was commonly called "above the line." In Windows 7, this feature has been automated with the PIN menus. In the illustration, see how WordPerfect, PaintshopPro, Excel, Notepad and Access are all clearly visible in the Start Menu:


To add a program to the Start Menu, do the following:

a. Locate any program or icon on the Desktop or in an existing Start Menu. For example, WordPerfect or Microsoft Excel.

b. 'Other-Mouse-Click' and choose "Pin to the Start Menu"

c. To test, click Start.

Another illustration showing the same idea:


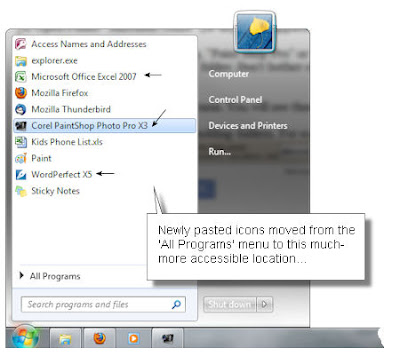
Note the new program(s) is listed at the top. You do not need to click "All Programs." The most commonly-used applications are one-click away from the Start Menu. Only place your most common applications in this list to avoid clutter.


9. Roaming User Icons (optional discussion)

Some manually-created (desktop) icons are not visible to other user-accounts, or when you look in the "Programs" folder, you don't see the icons there, but they are visible in the Start Menu.

These steps are useful when you create "document and data icons" and wonder where they went.

Windows keeps track of two sets of Start Menu icons: One for the 'All User/machine' and a second for the 'current user.' The Start Menu blends the two into one list.

In general, I recommend moving icons from the Current (Roaming) user to the All User's (machine) list; this way they are visible to other users on the same machine.

Click illustration for a larger view; click right-x to return

To Move the Icons from the Roaming Start Menu to the Machine Start Menu:

a. Tunnel Windows Explorer to

Users\(your userid)\AppData\Roaming\Microsoft\Windows\Start Menu\Programs

(Any icons you find in here are only visible to your login-id and many of these icons should be stored with the others built earlier.)

b. Locate, cut and paste these recommended icons:
Paste into (it helps to open an second Explorer window)

C:\ProgramData\Microsoft\Windows\Start Menu\Programs
  • "Command Prompt" to Util
  • "Notepad" to Accessories
  • "Narrator" to Accessories
  • "Magnifier" to Accessories
c. Then delete these folders from the Roaming Profile Start Menu:
  • Accessories (the entire folder)
  • Administrative Tools
  • Games
  • Maintenance
  • You must leave "Startup" and "desktop.ini"
Don't worry about deleting the Accessories folder -- there are two of them, one for the machine and one for your account and the Start Menu blends the two. Because of this, there is no harm in deleting the Roaming profile version.

10. Cleanup the Default Users Folder (optional)

Now that these icons have moved to the (All Users / Machine Start Menu), stop this pollution from bothering any other new User Account by making these strictly-optional changes:

a. Tunnel to

Users\default\AppData\Roaming\Microsoft\Windows\Start Menu\Programs

b. Delete folder "Accessories"
c. Delete folder "Maintenance"
d. Leave folder "Programs"
e. Leave folder "Startup"
f. Within folder "Startup", you may find programs, such as Dell Dock Run. Delete it if you don't use this type of feature.
With these changes, all newly-created user accounts will be pre-cleaned as they are created.

11. Favorite Document Icons in the Start Menu

I have certain documents that I always need to open and they would be handy in the Start Menu. In other words, by clicking the document in the Start Menu, it launches the application and opens the specific document.

Windows 7 is not as graceful in building these types of icons as I would wish (it was easier in XP and Vista). This step is optional and somewhat complicated. Follow these steps.

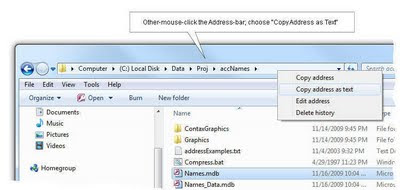
a. Using Windows Explorer, locate your document name (an access database, spreadsheet or other document).

b. Highlight the document name.

c. In the Explorer's address bar, other-mouse-click (illustrated) and choose "Copy Address as Text". Memorize the document name (e.g. Names.mdb); it is not copied as part of the address.


d. Move to the Windows Desktop, other-mouse-click, choosing "New, Shortcut"

e. Click Browse.

Locate the underlying application (e.g. Microsoft Access, Microsoft Excel, WordPerfect, etc.). You are looking for the actual EXE name. For MS Office, tunnel to "C:\Program Files (x86)\Microsoft Office\Office12\MSAccess.EXE" (Excel.exe, etc.)

f. While the dialog is still displayed,

- type a space and a quote (quote is required)
- Paste the previously-copied path name by pressing Ctrl-V
- Type a closing backslash, followed by the document's name, which you will have to type from memory; then close the quote (illustration shows an Excel sheet):

e.g. .."C:\Program Files (x86)\Microsoft Office\Office12\MSAccess.EXE" "C:\Data\Proj\Names.mdb"


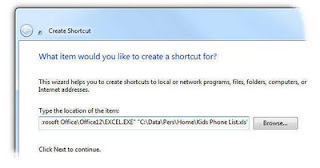
The resulting icon will be on the desktop.

g. Cut and paste the icon, placing it in

C:\Program Data\Microsoft\Windows\Start Menu\Programs

h. Rename the icon from "...copy" to any name of your choosing (e.g. "Name and Address List").

i. Optionally, "Pin" the new icon to the Start Menu. Once Pinned, you can delete the "Programs" icon, if desired; the Pinned copy will remain.

* To test: click the Start Menu (and or All Programs) to see the new icon.


12.Using a C:\Data Folder


This part is an admittedly advanced topic and is optional.

Why C:\Data?

On my computers, I always store all data in a folder called "C:\Data" -- this includes all pictures, music, documents, spreadsheets, macros and even program preferences. Basically, if it is something I created, downloaded, or customized, it lives in the Data folder.

As I upgrade from computer-to-new-computer, I simply copy the C:\data folder -- and all data is moved to the new machine. If multiple users have accounts on the same computer, their data also lives in this same folder. This way family members can get to the photos, music, etc. Of course, this makes backups easier too.

This is the final cleanup from Step1, where the Side-Menus were simplified. In that step you optionally hid "My Pictures", "My Music", etc. Here is where you build new locations for those types of data.
Only do this step if you have decided to not use C:\Documents and Settings (aka C:\Users\Your user-id\My Documents) to store your data. If so, continue with these steps.
Building the Data Folder:

a. Open Windows Explorer, tunnel to (or make) a folder called C:\Data.

b. Within C:\Data, create these sub-folders:
  • Download
  • DB (database)
  • Graphics
  • Music
  • Personal
  • Photos
  • Prefs
  • Presentations
  • Projects
  • Spreadsheets
  • WP (word processing)
  • C:\Data\WP\Macros

Change Program defaults:


This is a bit tedious. Launch each of your applications, such as Microsoft Word, WordPerfect, your photo-editors, etc. Within each program, locate the setting or preference that controls the "default data directory". Change it to an appropriate C:\data folder.

For example, setting a default data directory for Microsoft Word (2007):
  • Launch Microsoft Word
  • Click File (orb), click button "Word Options"
  • Choose the "SAVE menu
  • Change "Default file location"
    from C:\Users\yourname\Documents
    to C:\Data\WP
  • Within "Advanced", scroll to the bottom of the list and click the "File Locations" button
  • Change Clipart Pictures to "C:\Data\Graphics"
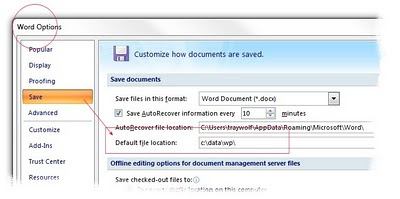
To test, exit and re-open Word. File-Open, should be C:\Data\WP.

Change other Microsoft Office Products:

Similarly, change other Microsoft Office Products. Each will have to be touched one-time. In some programs, you may need to create a dummy-document before you can open the Options menus (e.g. MS Access, PPT).

Change Windows Media Player's Default Directory:

This is a great example of a program that should not store its data in the user's roaming profile.
  • Launch Media Player
  • Click top-menu-bar "Organize"
  • Click Layout, check "Show Menu Bar"
  • In top menu Tools, Options, "Rip Music", change Rip Music location to C:\Data\Music

Change Word Perfect's Default Data Directory:
  • Launch WordPerfect, Tools, Settings, Document
  • Set Default Document folder to C:\Data\WP
  • Set Graphics: Default Graphics Folder: C:\Data\Graphics
  • Set Default Spreadsheet Folder: C:\Data\Wksheets
  • Set Database: C:\Data\DB
  • Set Default Macro Folder: C:\Data\WP\Macros

Change Corel Paintshop Pro's Default Data Directory:
  • File, preferences, File Locations: C:\data\Graphics (or Photos)

Change ITUNES default Directory:
  • Launch Itunes
  • Select menu Edit, Preferences, Advanced tab
  • Change the itunes media folder location
  • (Copy your previous library's location to this new folder)

In other words, where-ever possible, tell each application where the Data folder is. Once this is done, you can create new user accounts, fix corrupted ones, etc., without loosing access to your data. The folders are also easier to share.

The drawback to this design: the documents are not secured from other users on the system. However, without physical security, there is no security and your documents were not really safe anyway.

This completes this tutorial on Start Menu Cleanup


Related articles:
Windows 7 Explorer Settings
Windows Folder Locations
Windows 7 Initial Look

Dell XPS M1530 64-bit Drivers
Cleaning up Start Menu Programs (Speeding up a boot)
Slow PS/2 Keyboards and Windows 7

2010-10-09

PrizeOrama - Raffle Ticket Selection in Excel

Excel How-to: How to write a Raffle-ticket prize selection spreadsheet. This is the "PrizeOrama" sheet which you can also download. See also this more improved program: Keyliner PrizeSelect.

My sister called with this problem: Her son's grade school has 300 students and each are eligible to win prizes based on school and volunteer work. Students can earn 1 or more chances (much like a raffle ticket). She went on to say last year they wrote each student's name on a slip of paper and tossed them in a hat -- but with many students earning 15 or more chances, she said she'd never do that again.

Having raffle-like drawings can be easily automated in Excel with macros. If you have never written an Excel macro, this will be fun project and the instructions below should take less than an hour to write. When you are done, you will have a random name selector.

You can also download a completed version using this link.

Click on this Keyliner Public GDrive link:
PrizeOrama Excel Spreadsheet Download

Author's Note: Since this article was written, I developed a much more sophisticated prize selection / prize drawing program, which can be found at this link: Keyliner's PrizeSelect. This program is also free.


The completed data-entry sheet looks like this:

Winners are calculated in a result-sheet that can be displayed in a variety of different ways:


Constructing the Initial Sheets

1. In Excel, open a new workbook and name two of the sheets as "Names" and "NameResults". These names will be required by the macros. (Other-mouse-click the default sheet, "Sheet1" and choose Rename.)


2. As illustrated at the top of this article, type column headings on row 4:

A4 = "Name"
B4 = "Tickets"

Cell A5 (e.g. "Bobbie" contains the first test record)
Cell B5 contains the count of the number of tickets Bobby earned.

Continue to build a half-dozen test records.

(Optionally, if you are using numbered Raffle-tickets, type the lowest-numbered raffle-ticket in the first two cells (A5, and A6), then build a simple addition formula and fill-down to the largest-number; No need to put in a ticket-count, "1" is assumed.)

e.g.
65444 (in cell A5)
65445 (in cell A6 - to get past the Range-name in cell A5)
=A6+1 (in cell A7)

2a. Highlight cell A5 and "Range-name" the cell as "NameAnchor".

Select Formulas, Define Name
Name the cell "NameAnchor"

3. Expose Excel's Macro Development Tools:

a. Click the Microsoft Office Orb (the old File Menu), choose the "Excel Options" button at the bottom of the screen. In the "Popular" section, check "[x] Show Developer tab in the Ribbon"


4. Build an initial Macro by following these steps:

a. From Excel's top menu "Developer," click "Record Macro"

b. For the Macro Name, type "SelectWinners" and "store macro in 'This Workbook'". No need for a shortcut key. Press Enter and the macro will begin recording, noting the small blue square in the lower-left of the screen.

c. Click the mouse in Cell A5 ("Bobbie") - just so the macro can record something.

d. On the toolbar, click "Stop Recording"


5. Open the Visual Basic editor (Macro Editor):

a. While still in the sheet, press Alt-F11 (Visual Basic VBA editor).

b. On the tree-side, tunnel to "Modules, Module 1". This is where the code that drives this program will live. You will see a Range-Select statement in the macro; this is what you recorded in the previous step.

At any time you can close the macro-editor (clicking the "X"); changes are automatically saved and you are returned to the sheet. Press Alt-F11 to return to the editor.


c. Above the "Sub SelectWinners()" line, insert a few blank lines and type these three statements:

Option Explicit
Public iRecordCount as Integer
Public iEntryCount as Integer


It will look like this:


For technical reasons, all macros should have an "option explicit" line -- even though Microsoft does not default it. The other two statements declare variables.


6. Write the main "SelectWinners" Routine:

This routine is the longest routine in the program and it will take a few minutes to type. As you type, indent with spaces and make the code look pretty. Comments (green) begin with tic-marks and long-lines can have line-continuation characters:

(click image for larger view; click right-x to return)

Still within the same sub-routine, complete the code with these remaining statements. Both the code above and this code lives within the Sub/End Sub statements:


7. Write the Private Sub A100_ProcessRecords() routine:


a. Below the "SelectWinners" 'End Sub' line, press Enter a few times to insert blank lines, then literally type these commands in order to build a new routine:


The details within the "Do Until / Loop" will be filled in a moment. For now, just stub-in the routine.

b. Now fill in the Loop details for the A100 routine (this code lives within the Until/loop statements):

(Click for larger image; click "right-x" to return)

8. Write the A200_SortNameResults routine:

Continue with the next routine, which is typed below A100's "End Sub". You are almost done:


9. Write the ClearPreviousResults routine:


Building a "Select Winners" Macro Button

As illustrated at the top of this article, it is handy to have a button that kicks off the macro. Build a button and attach it to the "SelectWinners" macro with these steps:

Close the macro editor and return to the original spreadsheet.
Click on the "Names" tab and follow these last steps:

1. Using the top-menu, "Developer"

a. Click the "Insert" tool and then the "button" Forms Control Tool. Be sure you do not select the ActiveX version.


b. Once the button is clicked, move the mouse into the sheet and click-and-drag an outline of a button somewhere on the form where you want a "Select Winner" push-button. Let go once the outline is in place.

c. When prompted for a macro name, choose "SelectWinners", then "OK". Note: You can Control-Click the button to resize, move and change the button's properties.

Alternately, you can run the macro manually by clicking the top "View" menu, Macros, Run Macro. Choose "SelectWinner" from the list.

Testing

To test the macros, confirm you have test (student) names in cells A5 and down. For a few of the records, type a "Ticket" count of 5.

Click the "Select Winner" button.

Open the "NameResults" tab (bottom tab) to see the randomly-selected winners. Note that those people with more than one ticket are represented multiple times in the list. Each has a random number, but all numbers were sorted randomly. If you have three prizes to give away, choose the top-three names. Remember, the results list shows all eligible people in one list -- with every ticket represented.

Click "Select Winners" a second time to re-randomize the list.

Saving the Sheet

If you are using Excel 2007/2010, sheets with Macros must be saved in a special way. Select File (orb), Save-As. Change the filetype from "Excel Workbook (*.xlsx)" to "Excel Macro-enabled Workbook (*.xlsm)" - you must do this or the macros will be stripped out of the sheet.

When you next load the sheet, you will be prompted to "enable macros". See Microsoft Help for additional information on how to always allow macros on this sheet.

Description of Steps:

This article is not intended to teach macro programming, but here is a brief description of the program's logic.

The main module, "SelectWinners" calls A100_ProcessRecords.

A100_ProcessRecords starts in cell A5 (the first name) and moves one record at-a-time down the list. With each found record, it copies the (student's) name to the second "NameResult" sheet. If the student has more than one ticket, their name is copied multiple times.

As each name is copied, it is assigned a random number.

Once all the names are copied, the second sheet is sorted numerically by the random number. Note how the sort routine knows how many records were loaded and it uses this count to highlight the sort records.

Once sorted, the top name should be awarded prize #1, second name prize #2, etc. Usually, the grand-prize is awarded third. The downloaded version of this sheet (see below), contains other interesting features.

Disqualify a person by putting a negative number for the count (-e.g. -1). With this, their name stays in the list, but they do generate a random number and in effect become ineligible for the raffle.

If you need to have the person's name and phone number, type both in column A.

Downloadable Version:

This spreadsheet is available on Keyliner's Public GDrive site. You can download a complete sheet, with all macros, free of charge and you are welcome to use this routine as you please. If you use the sheet, drop me a note; I'd like to hear from you.

PrizeOrama Excel Spreadsheet download


The downloadable version contains several other interesting features, not documented here, along with full instructions on the features and use. My apologies for not having cut-and-paste code in this article; I've never figured out how to make those types of textboxes....

Other comments:
  • Remember, only click the Select Winners button one time -- all winners are randomized and calculated at the same time.
  • If a person has multiple tickets or the person is listed multiple times in the list, they have multiple chances to win and can win multiple prizes.
  • At this time, the sheet does not allow a person to win "only once" - even if they have multiple chances; this is a future enhancement.
  • The downloaded version has many more features than this article discusses.

Related Links:
PrizeOrama Excel Sheet Download
PrizeSelect - a more complete raffle ticket program

Enumerator - File-exist testing program

Utility Download: Enumerator.exe - A batch driven file-exist utility that can set Return-Codes against a list of files. Handy for testing batch downloads.


I needed to test a directory to see if 30 mainframe files were downloaded properly. If all files were present, then a batch scheduler would kick off the next step in a process. Testing this many files in a standard BATCH program would be tedious. To help out, I wrote a simple program called the "Enumerator."

Enumerator is a DOS (console) application which accepts list of passed filenames. If each filename in the list is found, the program sets a return-code of 00. This code can be tested in a downstream batch process, as illustrated below.


This is a free program, no license or registration required.
Developed in C#.
Runs as a DOS or Windows program.
You are welcome to download and use.


Enumerator.exe

From the Keyliner Public GDrive site, click this link and open the folder:
download Enumerator.exe

When saving the file, the location does not need to be on the path.
Instructions for Use:

Command-line Summary:
Enumerator.exe /? Help
Enumerator.exe c:\path\parameterfile.lst

1. Using an ascii text editor (Notepad), build a test input-parameter file, listing one filename per line. For example C:\data\parameter.lst:

;Test Enumerator Parameter File
;use Semicolons for comments

;Wildcards are supported


C:\data\testfile1.doc

C:\data\testfile2.xls
D:\subfolder\*.xls
\\server\share\folder\somefile.txt


Close and save the file to a known location. For example, "C:\Data\Parameter.lst"

2. Open a command-prompt (DOS Prompt); Start-Run, "CMD".

3. Change to the directory where Enumerator.exe was saved. For example:

CD "\Program Files\Util"

4. Type this command, all on one line:

enumerator.exe "C:\data\parameter.lst"

Use quotes if the filename or path contains embedded spaces.
Press enter to run.


Results:

DOS ErrorLevels
00 = All files detected
89 = One or more files were not discovered
99 = Startup/parameter error

The DOS screen SYSOUT will also report a summary of the findings. Be aware this may not be visible in a batch process, depending on how it is called.


Optionally launch in this manner:
"C:\Program Files\Util\Enumerator.exe" "C:\data\parameter.lst" >c:\data\log.txt

where results are recorded to a log.txt file, which can be reviewed with Notepad. Return-codes are set as before.


TESTING in a BATCH File:

Consider this sample batch file (C:\data\test.bat) for testing:

@Echo off
CLS
@echo Enumerator %1 %2 %3
@Echo.
enumerator.exe "C:\data\parameters.txt"
IF "%ERRORLEVEL%"== "99" GOTO PARMERR
IF "%ERRORLEVEL%"== "89" GOTO FAIL
IF "%ERRORLEVEL%" == "0" GOTO GOOD

:ParmErr
Echo Bad parameter file
Echo Use Enumerator.exe for syntax
Echo.
PAUSE
GOTO END

:Fail
Echo.
Echo Some files not found
Echo.
PAUSE
REM Remove PAUSE statement for production
GOTO End


:Good
Echo.
Echo All files accounted for....
Echo.
PAUSE
REM Remove PAUSE statement for Production
GOTO END

:END


Additional Notes:
The processor running enumerator must be logged in as a user with adequate rights to see the files being tested.

Leave a comment if you found this program useful.

2010-09-20

Brother HL2170W Printer in Perpetual Sleep

Issue:  Brother LaserJet (HL2170W) printer is in Sleep mode and does not wake up.  Printer does not print.  Printjobs stacked in queue. 

Other symptoms:
  • Printer Control Panel shows the printer is "offline"
  • The Printer Control Panel does not offer an option to put the printer "Online"
  • Power On/Off does not resolve the issue
  • Printer replies to a DOS PING test
  • BRAdminLight utility responds and can see the printer
  • Using BRAdminLight to reset to Factory defaults or to re-configure the printer, does not help
  • Diagnostic printing (from printer's configuration pages) works properly; pages print
This article assumes you are using Network Printing (and not a USB cable).


Diagnostics:

Follow these diagnostic steps to confirm the printer is talking on the network.

a.  From a DOS Prompt:  Ping 192.168.200.250   (where your IP Address may vary).  Ping responds in xx milliseconds; the printer responded to the PING properly.

If the printer does not respond to the expected IP Address, it's assigned address may have changed via "DHCP".  See the end of this article for a discussion on how to fix this.

b.  Using BRAdmin Light, confirm you can see the printer's configuration screens.  (BRAdmin is the utility used for configuring the printer when it was first brought online and installed in your network.)

If BRAdmin shows a different IP Address than the one you were expecting (see also, Printer Control Panel, PORTS, illustrated below), the printer is being re-assigned a different address via DHCP and this will confuse the printer control panel.  See the end of this article for recommended steps.

c.  Using a Browser, type the printer's URL (e.g. 192.168.200.250  (your address may vary)).  This should open the web-based configuration screens.  If prompted for login credentials, use  "admin" and "access" or the password you set when first configured.

These diagnostics show the printer is alive and well, talking on the network without problems.


Likely Solution:


In the workstation's Printer Control Panel, the TCP/IP port has likely changed.  Confirm the address is an IP Address and not some other type of port-setting.  In the illustration below, my printer had an "ADW" port, followed by a GUID ID.

If an IP Address is displayed, confirm the address (illustrated below as 192.168.200.250) matches the expected IP address used above in the PING test. 

Details:

1.  Open the Windows Control Panel, "Devices and Printers"

2.  Locate your printer:  Illustrated "Brother HL2170W series Printer"

a.  "Other-mouse-click" printer
b.  Choose "Printer Properties"  (do not choose Properties)
c.  Click the [Ports] tab

d.  Scroll down the list.  Confirm printer is setting on a real IP Address.

In my case, the printer was on a port named something like "ADW {EF6012...."  (followed by a GUID number).  It should be pointing to an IP Address, such as 192.168.200.250.  Your address may vary. 


If the Port is not an IP Address or is the wrong IP Address, continue with these steps (Windows 8 / Windows 7 similar):


e.  Click button: "Add Port"
     You will be adding a "Standard TCP/IP Port"


f.  Choose "Add a printer using TCP/IP address or Hostname"
g.  For the Port Address, type the IP Address of your printer.

Once setup, pending print jobs in the spool should immediately begin printing.


Bad Ports:

In my case, I am unsure how the printer's original TCP/IP port changed to a corrupted "ADW" value.  Using BRAdmin, I kept seeing the printer's status as "Sleep".  In fact, this is a red-herring.  During normal operations, the printer will always be in a Sleep mode when no jobs are pending.  Some sites recommend disabling Sleep; this is not recommended because of the power and wear-and-tear on the fuser assembly.


Followup Notes:

Once re-configured, you may find two Brother Printer icons in the Printer Control Panel.  The "real" printer will likely be marked as default.  You can safely delete the older printer icon.

DHCP Printers:

If you are finding the printer's IP address changes, especially after a power failure or after rebooting the printer, the printer is configured improperly -- using DHCP for its network address.  It should be using a Static (fixed) IP address.  Likely, you accepted the default settings when the printer was first configured and you likely used the installation CD that came with the printer.  DHCP addressing is a poor way to configure printers.  See the Keyliner article for proper steps:  Setting Up a Brother Wireless Printer.  Use these steps for both wired and wireless printers.

Related Articles:
Setting up a Brother Wireless Printer
Brother Wireless Printer fails after Power Failure
Brother Wireless Printer fails after a New Router
Extending Brother Printer Cartridges

Brother Printer Toner Cartridge

Howto: Getting more life out of a Brother Toner Cartridge. The toner light may light up sooner than it should. This article is a compilation of other blogs on this topic.

Contents:
  • Getting more life out of a Brother Toner Cartridge
  • New Cartridges and Old Drums
  • Resetting the Drum Counter
  • Toner LED solid Yellow
My Brother printer ran out of toner and instantly stopped printing -- even though it printed perfectly well earlier in the day. When this happens, you can coax more out the cartridge by gently rocking it back and forth. But ultimately, this Toner-out light will stay on and the printer will quit printing.

It turns out the toner cartridge is probably not empty.  The web reports most people consistently get another 800 to 1,000 pages by covering a sensor hole and tricking the printer. Most on the web noted that the supposedly "empty" cartridges still have a lot of toner in them and blame Brother for being nefarious.

I think the real reason is more benign. Measuring toner levels is more of an art than a science and without spending a ton of money on an interior electronics, Brother used a relatively simple but flawed mechanism to measure toner. Why did they put in extra toner? They wanted to ensure they reached their advertised page count -- with no chance of falling short. In other words, they over-filled the cartridge to make sure they were honest -- but it still it seems wasteful not to use all of the available toner.

The cartridge has additional of life remaining even when the toner light turns on


A 2,500 page replacement cartridge is $70.
A new drum-roller assembly is $120.
A new printer, with a 1,000-page "introductory" cartridge, is $80.

Sometimes it pays to buy a new printer.


Tricking the Printer:
Covering the Sensors

Follow these steps to extend the life for any of these printers or cartridges. This step also seems to resolve a solid-yellow toner LED on new cartridges:


1. On the side of the toner cartridge is a clear round window. Cover it with any opaque tape (this also fixes the solid yellow toner light / error you might get when you move cartridges from one printer to another). Color it with a sharpie if you'd like.

Optionally, and this is not necessarily recommended, look inside the toner-bay on the printer itself and cover the sensor holes there. Doing it this way permanently disables the toner-sensors for all cartridges.

2. Gently rock the cartridge back and forth and side-to-side to re-distribute the toner.

3. On the top, outside right-edge of the cartridge is a blue or green slider. Slide it back and forth a half-dozen times to clean the corona wire. Be sure to return the slider to the far-right position.

Return the cartridge to the printer and try printing again. All should be well. Print until the quality of output degrades (gray print).

Additional notes: Searching the web you can find other tricks about these toner cartridges. The cartridge has a mechanical "flag"; once it reaches its limit, the cartridge stops all printing. With a minor dis-assembly, you can reset this geared mechanism and get a bit more life out of the toner. If you do this, you may get a gray-haze on the paper as the older, recycled toner is forced onto the paper. As the drum ages, the flag forces a larger current onto the paper to help the toner stick, rolling back this flag can cause the gray film. If you refill your cartridge with third-party refillers, you can reset this flag all the way. Details on this can be found elsewhere on the web.


When you buy a new Cartridge:

Don't make this mistake: When you return your used cartridge (recycle), be sure to take only the toner - and not the drum. On Brother 2170w printers (and probably other models), these are separate components, where one fits into the other, even though both are removed at the same time.

Return the Toner and leave the Drum (DR-360) assembly with the printer. Only purchase the Drum unit when you have reached your 12,000 page service life (see below) and the "Drum" light is illuminated on the the printer's main panel. As a side note, do not leave the drum unit exposed to bright or prolonged light.


Replacing the Drum Roller - Don't

If you have reached the Drum's end-of-life (12,000 pages), and top panel displays a drum error, consider re-setting the drum-counter to zero and keep running with the same drum until print quality fails. Many have reported 20,000 and more copies on the same unit. This will save about $120 -- which is amazing because the entire printer was only $100 to begin with.
  • Do not use these steps for replacing a cartridge
  • Do not use these steps for toner errors
  • These steps are for the HL-2170w and the HL-2140 with a Drum Error. See Brother support for other models.

1. Turn printer on. Confirm the DRUM LED is blinking.

2. While the printer is still on, open the front cover and remove the toner and drum unit (as illustrated above).

3. At this step, you would replace the drum-unit with another; I propose you skip this and continue with the old drum roller.

4. Return the toner and drum unit to the printer. Leave the door opened.

5. Press and hold the the white button (GO button) for about 4 seconds, until all LEDs light:

Once all LEDs are lit, release the button

6. Close the front cover. The printer will think you have installed a new Drum and it will reset the counters to zero.


Toner Light Solid Yellow on a New Cartridge

On a new Brother HL-2170W printer, after attempting to print the network configuration / printer setup pages, the printer slipped into an error condition where the Toner LED was solid yellow and the printer refused to print -- even though it had a new cartridge and had printed earlier.

Despite what you read on the web, there is no sequence of buttons you can push that will reliably solve this problem on an HL-2040 or 2170w printer. Resetting the Drum counter (pressing GO 5 times and other such steps) will not help.

Solution:

1. Brother's suggestion of removing the cartridge and separating the toner assembly from the drum; then re-inserting is meaningless; as there are no obvious electronic connections between the two devices, but you had best try it anyway. I tried this a dozen times before deciding it was pointless.

2. Rocking the toner back and forth a bit more vigorously than usual may temporarily fix the problem (when you do this, it clouds the sensor windows and makes the printer think all is well.) Be sure to clean the corona wire.

3. If this is a new Brother-branded cartridge, contact Brother Support (call their support number US: 877.276.8437. If you email, you will spend two days with nothing but canned email responses that cover steps 1 and 2 above.)

Once I called Brother Support, and after reading my cartridge's serial number, they reported a known "manufacturing defect" within an unspecified range of serial numbers. They promptly offered to replace the cartridge and a new one is in the mail. You may or may not be that lucky.

In my case, compliments to Brother Technical support on identifying and acting on the problem, because something was clearly wrong. If your cartridge is not in the serial number range, read-on.

3. On a lark, I used the "Covering the Sensors" step from above and surprisingly, this masked the problem and I could once again print. This is not as Brother intended and the cartridge I had was certainly malfunctioning - but I got nearly a year's worth of use out of the failed cartridge.

Commentary:
It won't be long before Brother puts electronics into the cartridge and raises the price in order to stop these tricks. This is what HP did. At that point, we consumers should simply revolt with protests in the streets. I understand Brother wanting only the finest print quality -- but I remember the good old days when the toner ran dry, the print looked poor and we consumers would say, "I guess it is time to buy another toner cartridge." We don't need a machine to tell us. The way Brother and HP do it seems too self-serving, hence these stupid printer tricks.

Known Cartridges where this article applies:
LC 51 cartridges
TN-560
TN-540
TN-3130

HL-1850
HL-2140
HL-2170
HL-2030
HL-5170
HL-5250DN
DCP1000
MFC-8870DW

Related Links:
Reference for Brother Printer LED Indicators


Related articlesKeyliner Brother HL-1020 Printer Review
Keyliner Brother HL-2170w Printer Review
Setting up a Brother Printer on Wireless